With a new little one on the way, I am preparing now for quick meals for later this pregnancy (when mama is too tired to do anything) and for when the baby arrives. I teased my husband that we were stocking our freezer just in time for hurricane season. He assured me the generator would be ready to go to keep that freezer going should we be hit with a storm. LOL
Stuffed Bell Peppers is one of my favorite recipes. Peppers are very versatile in what you can stuff them with and most recipes are gluten free. They also freeze well for later consumption so a big plus in my book.
This recipe makes between 14 and 16 stuffed peppers depending on the size of your peppers. The last batch I made was 16, but while working with this group (32), I was only able to make 28 peppers with the recipe. These peppers were huge!
Ingredients:
14-16 firm Bell Peppers
3lbs ground meat (very versatile, use beef, chicken, turkey, pork, etc..)
4 cups cooked rice (I like Basmati rice)
2 cans 28oz each of diced tomatoes (I prefer Hunts with basil & oregano added)
1 can 15oz of tomato sauce (Hunts is used here)
spices: salt, pepper, onions (dried or raw - your choice), garlic (powder or minced - your choice), oregano, thyme
Here are the Johns Island peppers (33)we picked up at the farmer's market 3 for $11
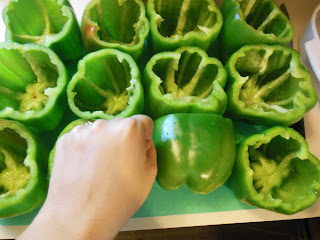
Slice the peppers at the top, reserve the tops for later, remove seeds and ribs.
Brown your meat and drain grease
add seasonings and the diced tomatoes
Peppers prepped for the water bath
Here you can see just how big these peppers are.
Carefully submerge peppers into the boiling water to blanch them. They will turn bright green first, and then go dull. When they are as cooked as you prefer, carefully remove them and set them upright in a baking dish. Repeat with additional peppers until they are all cooked.
Take your meat mixture and add it to a very large mixing bowl
Cook rice per instructions on package
Add the rice to your meat mixture
Mix in your tomato sauce until it is the consistency you prefer
Spoon the mixture into the peppers. Be sure to fill them completely.
Top with cheese if you prefer (this was my first batch ever topped with cheese) and bake at 350 until the cheese is brown & bubbly. Mmmmm..... nice and gooey. These are the ones I did for dinner.
Here are all of the peppers filled and ready for their bags.
All of the rest were placed in FoodSaver freezer bags and the air was sucked out, and bag sealed with our FoodSaver. Sealed up, marked and ready to go!! I do recommend thawing completely before baking after freezing. Otherwise, it takes FOREVER for them to heat through.
Well I started working on this post back in June. Yes, I know. We have been very busy with our homeschooling trying to get 90 days (half year in) before the baby arrives. Along with nesting for the baby and cooking, I haven't had much time!! I did do another batch of peppers and I stuffed them in the middle with a mixture of 1 whole container of Ricotta cheese, mixed with fresh mozzarella, grated Romano & Parmesan cheese, divided between all the peppers. I put a little of the meat mixture in the bottom of the pepper, then a couple heaping tablespoons of the cheese mixture, then the meat mixture to the top. Then topped them with mozzarella. Oh MY!! They were fabulous and that's how DH wants them from now on!
I hope you enjoy the recipe!!


3 comments:
So when you added the cheese, did these freeze ok? Or rather...did they unfreeze ok? :-)
So when you added the cheese, did these freeze ok? Or rather...did they unfreeze ok? :-)
@Kelly While many people don't recommend freezing cheese, I find it ok to freeze. After all think about how many companies freeze cheese on pizza and other types of frozen entree's.
Post a Comment