Tuesday, August 23, 2011

Eggplant Parmesan ~ A Tutorial

I want to say a big WELCOME or Céad Míle Fáilte to all of our new readers!! Don't forget to "Join this Site" through Google or Networked Blogs for all of our updates!!

My dad came to stay with us overnight (he does this often) and he brought with him two large eggplants. He bought them because he wanted to make Eggplant Parmesan, but my mother doesn't like eggplant, so the eggplants waited.... and waited....

So he brought them to my house, and we stopped off at my weekly Wednesday Farmer's Market and picked up 3 more slender ones to go with the two larger ones, and a gallon of Raw Milk.

We adapted this recipe from Whole Foods' Easy Baked Eggplant Parmesan

Ingredients

1 large eggplant, sliced lengthwise into 1/2-inch-thick pieces (about eight)
2 eggs, beaten with a fork
1 1/2 cups panko bread crumbs (sundried tomato or plain) * we used regular breadcrumbs
2 tablespoons extra-virgin olive oil*
1 (25-ounce) jar pasta sauce (roasted vegetable or any variety) * we used Prego
1 cup shredded mozzarella cheese*
1/2 cup shredded parmesan cheese
Method

Preheat oven with a baking sheet inside to 375°F.

First peel and slice your eggplant
**Please note that this recipe does not call for macerating your eggplant. We did not, but you certainly can!**

all nice and sliced. Dad left the peel on some of the sides - don't do this unless you REALLY like the peel

Beat your two eggs with a fork

Proper chef attire is required ;)

Coat eggplant slices with beaten egg, then bread with panko crumbs.

Spread oil on hot baking sheet

and place eggplant slices on it in a single layer.

Ready to go in the oven, Bake 15 minutes

Remove, flip and bake another 10 minutes.

Remove the eggplant from the oven. Increase oven temperature to 475°F.

In an 8 x 10-inch ovenproof dish, layer pasta sauce,

then eggplant,

then Parmesan cheese

then mozzarella cheese.

Repeat, finishing with cheese.

Bake until the cheese melts and turns golden in spots, about 15 minutes. We did this exactly 15 minutes and the cheese came out quite browned. That's ok though! My dad LOVES his cheese toasted! We made this a second time at my parents home, and my mother's stove took almost 30 minutes to achieve a melted cheese appearance.

mmmm.....nice and bubbly!!!

First slice for the boys. I put this in the freezer to quick cool, then divided it in half for them. Not exactly pretty layers, but it was very yummy!! John-Michael at thirds!!
Enjoy!!


Monday, August 22, 2011

Queenship of Mary

August 22nd is the Feast day of the Queenship of the Blessed Virgin Mary. For our non-Catholic friends, it means we are celebrating the day that Mary was crowned Queen of Heaven (check out the link - it's very informative).

Today to celebrate, we are coloring St. John the Baptist Religious Catholic Church's coloring page of the crowning of Mary.

John-Michael wanted to use orange & brown with a bit of yellow for the halos.

Joshua colored Jesus in Red and Mary in Blue. He said that Mary's crown was "Sparkly" and drew rays coming from it.


Here is an activity that I came up with.

Items needed:

construction/colored paper cardstock (gold or yellow colored)
watercolor paint, brushes & water
smocks (optional)
newspaper (or mess containment of your choice)
glue
flowers
Sequins
hair dryer
print out of a crown

I chose THIS crown for our activity. Print your desired crown out onto your paper. Or if you paper is Uber thin like mine, print it out on plain paper and tape it to your window, then place your colored paper over it and trace.

Lay down your mess containment of your choice. I chose newspaper. We get a circular every Tuesday with the upcoming grocery circulars in it. I gave each boy their paint set and brush and their own water.

Allow the students to paint their crowns.


Once the students have finished painting. Set your hairdryer on the lowest setting and let them blow it dry. It takes just a few seconds.


When the crowns are dry, it's time to pull out the sequins, roses and glue!! My rose garden is still in bloom, so I pulled some petals from my spent roses.

Joshua loves gluing

John-Michael showing me a sequin

OUR FINISHED WORKS OF ART

Here is the one I did

John-Michael's

Joshua's


Saturday, August 20, 2011

Seton Home Study Week 1

Today was our first week of school for the 2011-2012 school year and Seton Home School's Kindergarten week 1.

In addition to our given lesson plans, we used:

Sign of the Cross coloring page

From the St. John the Baptist Catholic Church's page, we used their Assumption of the Blessed Virgin Mary, and the Holy Trinity coloring pages

(and somewhere I found a St. Timothy Coloring page, but I can't find it now)

we read Tower of Babel from the Alice in Bibleland Storybook series

used letter T in the Cuisenaire Rods Alphabet Book

Here is Joshua working today with his Cuisenaire Rods. He loved them so much, he wanted to pull them out today and work with them.

a closeup of his Alligator from his "A" page. Since I hadn't planned any school work today, I just gave him the first available sheets.

Our Seton Preschool curriculum has not arrived yet (although I heard from Seton regarding the delay and most of our curriculum shipped on Friday). So for our first week, I had to create our own. Since the first letter in Phonics for Young Catholics K is the letter T, I made a unit study of T for John-Michael.

I pulled most of the unit from Erica over at Confessions Of a Homeschooler's
Preschool Letter T for Turtle

for Handwriting we used:
Letter Tt tracing
T dots page
Tt sorting
Turtle coloring page
and Turtle writing practice

For Math:
Turtle Size sorting
Turtle color sorting
Counting Practice
Turtle Pattern sheet

John-Michael also used our wooden Tangrams and did the Pre Kinders Turtle Tangram and lessons 1-5 in Mc-Graw Hill's Math Discoveries Pattern Blocks book.

Here is John-Michael working with his Tangrams, I think i found his new favorite thing! I put them out on a cookie sheet I bought for $1 at the Dollar Tree. I have 2 of those steel trays and they are GREAT for using as Tot trays!!

Here is our artwork for the week hanging up.

more artwork


We finished a week's worth of school by Thursday. On Friday, we met up with a couple of our homeschool groups at Wannamkare park for a "Not Back to School" party! The boys had LOTS of fun in the splash pad. Too bad mommy left our bag of swim stuff on the couch! Yikes!!


To finish everything up, we enjoyed s Spaghetti lunch.
Someone LURVES his Spaghetti!!


Our First Day 2011

Yay for our First Day of School 2011!!

Our first day of school was August 15th, the Feast of the Assumption of the Blessed Virgin Mary (for non-Catholics - the Assumption is the day we celebrate when Mary went to heaven - body and soul).

In addition to our regular curriculum, the boys colored an Assumption page, a Sign of the Cross coloring page and read the Tower of Babel story

Here are our beautiful boys working on their school work.

Joshua - our little Kindergartner


John-Michael - our Preschooler


Not Back to School Blog Hop

Our Homeschooling Space

Currently, we have no extra space in our home for a homeschooling classroom. I am tempted to use my dining room like a lot of homeschooling mothers do, but I am planning to use that instead of the breakfast nook area for our meals. If I had not pre-inherited my dining room suite, I would give it up in a heartbeat. But I love my mahogany set. I have been thinking of moving the hutch and table and chairs into the breakfast area and using that, but I don't think it will fit very well.

So for the time being, we are using our breakfast nook and current kitchen table. This table is going to my parents as soon as we get desks for the boys which should be within the next coupe of weeks when we have our trip to Charlotte.

First up is Mommy's desk. This is my early 1900's Sellers kitchen cabinet. Most people call them Hoosier cabinets since Hoosier is the most recognized name. It is in the process of being refinished from the red on the bottom to the plain oat at the top. I am tempted to paint it with milk paint instead of staining the oak. I'll work on it more when it gets cooler outside. I can't wait for it to be finished!!

This is my materials cabinet. The top left is our curriculum books and the top right are books for things like Art, Science, History, Math, etc... The second shelf contains our art supplie like paints, crayons, markers, coloring pencils, stencils, scissors, etc... It also houses our beakers for Science (our test tubes and scales are that the top of the cabinet). Our next shelf has our Kapla blocks, magnifying glasses, flash cards, computer programs, and the boys' pencil boxes.

For the start of the year, Joe and I gave the boys a present of their own pencil boxes. Inside was a "My First Ticonderoga" pencil, 12 pack of Crayola Coloring Pencils, 10pck of Crayola Markers, and a box of 24 Crayola crayons. They each picked out the color of their box. Joshua chose blue, and John-Michael chose green for their boxes.

The basket on the left of the next shelf down contains our Leap Frog Phonics game, and other games. The basket on the right contains more books that I use.

Our whiteboard is on top of our manipulatives area.

Our Manipulatives area. This is where we keep our Lacing beads, Measuring cup games, wooden puzzles, Tanagrams, Cuisenaire Rods, children's games, and Montessori items. I have two cookie sheets that I got from the Dollar Tree that I use to make up Tot trays. These are hands-on activities that I alternate giving bookwork and hands on games while I work individually with each of the boys.


a close-up of our whiteboard. We are the Saints Brigid & Patrick Academy. I tell the boys the day of the week, and the date each morning. As well as any Feast Day. At the bottom is the current prayer we are working on memorizing.

here is our calendar and Pledge of allegiance. Right now I am hanging the current week's artwork on the windows. These are the boy's chairs at the table.

I will post again once we decide on what we are going to use for the boys to sit at. That will allow the space to set up our art and our computer areas as well.

what do you use for a homeschooling area?
Not Back to School Blog Hop

Friday, August 19, 2011

My Favorite Things

Aimee's post this morning over at Simple Bites got me thinking about my favorite things. So I grabbed my Nikon, and 3 of my favorite things and thought I would share them with you this morning.
First up is my all time favorite - Snowflakes on Turquoise vintage 2.5qt Pyrex casserole dish. This was inherited by my husband when his mother passed away. I LOVE this piece!! My favorite thing to bake in it is Blueberry French Toast Casserole (yep, I'll be doing a post on that in the near future!)

Look at that beautiful gold work on the lid. You just can't buy stuff like this anymore!


Second favorite is my new (to me) late 50's Pyrex Hostess Casserole Dish with lid in Harvest Red. I bought this from my friend Beth over at 3 Little Chickens. She runs a fantastic Etsy shopped names Vintage Bizzy. Stop on over there for some GREAT vintage pieces and fantastic prices!

My third is this vintage Chip & Dip bowl set. I can't find a marking on it, so it might have been a generic piece that my inlaws picked up. DH remembers them having lots of parties when he was young and this was always there.

I have several other favorites, I will post them here and there for your viewing pleasure.

What are your favorite pieces? Do you have vintage pieces that you enjoy?


Wednesday, August 10, 2011

2011-2012 Curriculum

This year was the easiest this year to decide on which curriculum we would use. We decided early on in our homeschooling journey that Joshua would be kept with his peers (he's an October baby so the school system would keep him back a year). He is also very bright and has craved learning since he was little. He LOVES booklearning and doing book work so we have continued to foster that throughout his preschool years.

Joshua will be 4 this October and is enrolled in Seton Home Study's Kindergarten program. Joe and I love how the program is a traditional, orthodox, Catholic program. I think he will learn more from his Kindergarten Catechism book then I learned during my entire time in the RCIA program. Seton is also very flexible. We can supplement where we feel there is a need, I can create my own lesson plans, or use theirs (Math, Phonics, Religion are the big 3 Lesson Plans they have - the others are create your own), and we can also bring in higher level studies if the student is more advanced. I am thinking that Joshua might fly through the Kindergarten Math and be ready for first grade Math in the middle of the year.

Here is a breakdown of his books:

Letters and Numbers
* Everywhere We Go (Christian)
* ABC Coloring Book (Catholic)

Handwriting
* Kindergarten Handwriting for Young Catholics

Mathematics
* Math K for Young Catholics
* 123 Coloring Book (Catholic)

Music
* Songs of Praise (Catholic CD)

Phonics
* Kindergarten Phonics for Young Catholics Vol. 1
* Kindergarten Phonics for Young Catholics Vol. 2

Physical Education
*Outside play and field trips

Religion
* Kindergarten Catechism for Young Catholics
* My Jesus and I
* Catholic Coloring Books (3)
* Leading Little Ones to Mary
* St. Joseph Picture Books (3)

Science
* Kindergarten Science for Young Catholics

John-Michael will be doing preschool again this year. Last year I allowed him to flit in and out of our lessons. This year, I think he will be more interested in learning as he has to do EVERYTHING his older brother does.

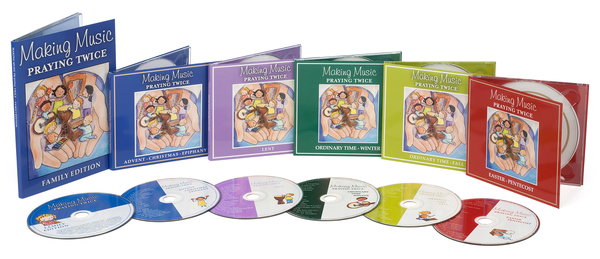
We will be doing Making Music Praying Twice for our music and movement curriculum.
I had seen it in our Emmanuel Books catalog, but when I went to the IHM National Conference, I was able to put my hands on this curriculum and see it first hand. It is a wonderful, Catholic, "Kindermusik-like" program. The boys loved going to Kindermusik and we were disappointed we couldn't put them in this past year - but it is uber expensive. The cost of this program is less than 1 child in a 12 week session, plus I can use it year after year!! I am currently downloading all of the songs to my iPod Touch so that we can take the music anywhere we go!

Both boys will also be using Teach Your Child to Read in 100 Easy Lessons

Thanks to my AWESOME friend, Beth, we have one of the Faith and Freedom Catholic Readers from the 1950's.

We will be supplementing our science with the Usborne Science Activities books, and various projects found online.

John-Michael has been enrolled in Seton's Preschool program. It was set to be released August 15th, but that has been pushed back to September 15th. In the meantime, he will be doing Letter of the Week program that I glean from different sources such as Catholic Icing, Catholic Toolbox, Confessions of a Homeschooler, 1+1+1=1, and other online sources.

Have you finished your curriculum yet??

Not Back to School Blog Hop

Wednesday, August 03, 2011

Homeschooling Planners

So planners seem to be a big deal in the homeschooling community. Not only to keep us on track, but also to help show the work that has been done (our records). This morning, Angie over at Many Little Blessings wrote on how she creates her planner. I thought there were some great concepts in her book.

While at the IHM National Conference, I saw these From Family Centered Press:

I really liked that they would incorporate the Daily Planner and the Lesson Planner and the Menu in one book!! I love all of the traditional art that they have for their planners as well.

This morning on one of my Catholic Homeschooling Email lists, this link came up for a FREE PLANNER from Sanctus Simplicitus. There isn't a clip art picture of the planner but here are some of the features:
A Traditional Catholic Homeschool Planner

*Based Around the Traditional Liturgical Calendar*
*Room for 4+ Children's Lesson Plans*
* Menu planning available right on lesson planing page!!!*
*Color Coded for the Liturgical Season*
Download a Liturgical Wheel Here for Season Colors
*Special Devotions for Each Month*
*Saint Quotations and Bible Quotes for Each Week*


I LOVE this!! I'm having DH print these off today (because I am totally out of black ink at the moment) and see how they compare to what I am using now, and which one might be more useful.

Right now I am using Seton Home Study's Teacher Planner
in combination with their Seton Family Appointment Calendar

The Planner book is a generic plan book with weekly pages in the front and calendar pages in the back. I would love a book that has the calendar month at the front- complete with Liturgical Feast Days, and weekly gridded pages behind it.

So I will see tonight how the Sanctus Simplicitus Planner works out. I Love that the planner I'm using now is spiral bound, but the Sanctus Simplicitus planner isn't - and I'm not thrilled about that. I guess I can have it bound at the end of the year so I can keep our records per South Carolina State Law.

Note - I lovethat my Facebook images turn up teeny tiny here on the blog, but outside picture links turn out to be huge. And Blogger photo uploader just does not like my internet access (which is slowwwwwwww......). I guess I can't win. LOL

What type of Lesson Planner are you using this year???

Tuesday, August 02, 2011

Strawberry Balsamic Preserves

Strawberry season in the Lowcountry comes early. We were so busy that we missed it this year. However, Costco had strawberries for $1.94/lb in 4 lb clams. I bought two! I brought them home to make my two favorite Strawberry preserves. My first is Strawberry Freezer Jam, my second is Paula Deen's Strawberry Balsamic Jam

Yields: 6 Cups

Ingredients:
8 cups strawberries, washed and hulled (about 1 ½ pounds)
5 cups sugar
½ teaspoon butter
3 tablespoons balsamic vinegar
6 half-pint canning jars, lids and bands


Directions:

Wash strawberries to remove any field grime.


Remove the tops


Add to Dutch Oven, or in this case a Le Crueset French Oven


In a Dutch oven, mash strawberries with a potato masher. Cook over low heat, stirring frequently, until strawberries begin to simmer.


Stir in sugar, and cook over medium heat until sugar dissolves and mixture comes to a boil. Stir in butter, and return mixture to a boil.


Reduce heat to medium-low, and simmer 40 minutes or until strawberries are soft and the sauce has thickened.


Remove from heat and stir in balsamic vinegar.

Sterilize jars, lids and bands just before using for 10 minutes in simmering water or in the dishwasher. Remove one at a time when ready to fill.

While strawberry mixture is still hot, ladle into the hot sterilized jars, filling to within ¼ inch of the rims. Wipe rims with a clean, damp cloth, and seal jars with lids and bands.


Process in a boiling water bath for 10 minutes. Remove from the water bath, and cool completely at room temperature.

Serving Suggestions: For a quick dessert, warm a couple of tablespoons of Strawberry Balsamic Jam in the microwave and drizzle over a scoop of homemade vanilla bean ice cream.My boys love it over gold 'old fashioned PB&J as well as warm, homemade biscuits!

Courtesy of Cooking With Paula Deen Magazine July/August 2010


BTW - 2 4lb boxes got me 6 1/4 pints of Strawberry Balsamic Jam, 2.5 pints of Freezer Jam, and a big bowl of fresh, sliced strawberries to top the homemade pound cake I made.


Blessings!!

Growing Home
Related Posts Plugin for WordPress, Blogger...