Saturday, August 27, 2011

When Plans Go Awry

When we homeschool, we are dedicating ourselves to educating our children and setting aside the time to do the educating. Yes, we are all constantly learning, so I am talking about setting aside the time to do book learning. So what happens when our plans go awry?

That happened this week. I went and got dad on Tuesday so we could watch the kids Wednesday for a funeral. Well, Tuesday was going to be a quick pickup and back home and do our schoolwork. Because homeschooling is flexible like that. ;) But we ended up being out ALL day. So Tuesday was shot. I did have dad sit down with Joshua and do a Math sheet (working on Tallying), and a handwriting sheet (backwards circles).

Wednesday, we went to breakfast at Chick-Fil-A and I was working on the new lesson plans for John-Michael because I received most of his Preschool Program from Seton on Tuesday. Time got away, and I realized I had just enough time to get the boys back home, grab a shower and head off to Sullivan's Island for a funeral. So schooling would be put off until after nap time.

Well, I had just gotten home and had done upstairs to change, when I heard the crying then my dad yelling for me to come downstairs. So I rushed downstairs to find John-Michael bleeding profusely from the forehead. I grabbed a clean towel and we held pressure for a couple of minutes until the bleeding ceased. A quick check of his pupils, and I knew he was good but would need stitches. So I ran upstairs and changed and we loaded up and headed to the Urgent Care Clinic for our doctor's office. We walked right in and was seen in 5 minutes.

He needed 3 stitches, but since they would not be subcutaneous stitches, we opted for the glue. He was glued up, and we were on our way. He started complaining about it itching and my dad tried to keep him from touching it. We had gotten to Raising Canes for dinner when I called the Urgent Care to say we would be coming back after dinner since he had ripped out the glue.

Everyone fed, we headed back to the clinic and John-Michael was butterflied bandaged up very nicely. Then he ripped off one of those. So out came some blue sticky bandage and he was bandaged up around his head. We got home around 8:30 so Wednesday was shot.

Thursday we got up, did a couple quick pages in our workbook and worked with manipulatives then we were off to the Children's Museum of the Lowcountry. Here are some pictures my friend, Nikki, took of the boys at the Children's Museum in the art room. we had a great time as always and it was a good first time for her and her daughter, Isabella.


the bandage really makes his cut look more worse than it is


Ta Da!


Friday is an "off day" for our school. It is a make-up day if we need it, b/c I really want to keep the boys on track of lesson plans. We were able to make up all of our work so we are still on schedule.

So what do you do when your plans go awry? Do you pick up where you left off and be "behind?" Do you forge ahead and make it up to stay "on schedule?" Or do you have another secret for dealing with unexpected events?

Tuesday, August 23, 2011

Eggplant Parmesan ~ A Tutorial

I want to say a big WELCOME or Céad Míle Fáilte to all of our new readers!! Don't forget to "Join this Site" through Google or Networked Blogs for all of our updates!!

My dad came to stay with us overnight (he does this often) and he brought with him two large eggplants. He bought them because he wanted to make Eggplant Parmesan, but my mother doesn't like eggplant, so the eggplants waited.... and waited....

So he brought them to my house, and we stopped off at my weekly Wednesday Farmer's Market and picked up 3 more slender ones to go with the two larger ones, and a gallon of Raw Milk.

We adapted this recipe from Whole Foods' Easy Baked Eggplant Parmesan

Ingredients

1 large eggplant, sliced lengthwise into 1/2-inch-thick pieces (about eight)
2 eggs, beaten with a fork
1 1/2 cups panko bread crumbs (sundried tomato or plain) * we used regular breadcrumbs
2 tablespoons extra-virgin olive oil*
1 (25-ounce) jar pasta sauce (roasted vegetable or any variety) * we used Prego
1 cup shredded mozzarella cheese*
1/2 cup shredded parmesan cheese
Method

Preheat oven with a baking sheet inside to 375°F.

First peel and slice your eggplant
**Please note that this recipe does not call for macerating your eggplant. We did not, but you certainly can!**

all nice and sliced. Dad left the peel on some of the sides - don't do this unless you REALLY like the peel

Beat your two eggs with a fork

Proper chef attire is required ;)

Coat eggplant slices with beaten egg, then bread with panko crumbs.

Spread oil on hot baking sheet

and place eggplant slices on it in a single layer.

Ready to go in the oven, Bake 15 minutes

Remove, flip and bake another 10 minutes.

Remove the eggplant from the oven. Increase oven temperature to 475°F.

In an 8 x 10-inch ovenproof dish, layer pasta sauce,

then eggplant,

then Parmesan cheese

then mozzarella cheese.

Repeat, finishing with cheese.

Bake until the cheese melts and turns golden in spots, about 15 minutes. We did this exactly 15 minutes and the cheese came out quite browned. That's ok though! My dad LOVES his cheese toasted! We made this a second time at my parents home, and my mother's stove took almost 30 minutes to achieve a melted cheese appearance.

mmmm.....nice and bubbly!!!

First slice for the boys. I put this in the freezer to quick cool, then divided it in half for them. Not exactly pretty layers, but it was very yummy!! John-Michael at thirds!!
Enjoy!!


Monday, August 22, 2011

Queenship of Mary

August 22nd is the Feast day of the Queenship of the Blessed Virgin Mary. For our non-Catholic friends, it means we are celebrating the day that Mary was crowned Queen of Heaven (check out the link - it's very informative).

Today to celebrate, we are coloring St. John the Baptist Religious Catholic Church's coloring page of the crowning of Mary.

John-Michael wanted to use orange & brown with a bit of yellow for the halos.

Joshua colored Jesus in Red and Mary in Blue. He said that Mary's crown was "Sparkly" and drew rays coming from it.


Here is an activity that I came up with.

Items needed:

construction/colored paper cardstock (gold or yellow colored)
watercolor paint, brushes & water
smocks (optional)
newspaper (or mess containment of your choice)
glue
flowers
Sequins
hair dryer
print out of a crown

I chose THIS crown for our activity. Print your desired crown out onto your paper. Or if you paper is Uber thin like mine, print it out on plain paper and tape it to your window, then place your colored paper over it and trace.

Lay down your mess containment of your choice. I chose newspaper. We get a circular every Tuesday with the upcoming grocery circulars in it. I gave each boy their paint set and brush and their own water.

Allow the students to paint their crowns.


Once the students have finished painting. Set your hairdryer on the lowest setting and let them blow it dry. It takes just a few seconds.


When the crowns are dry, it's time to pull out the sequins, roses and glue!! My rose garden is still in bloom, so I pulled some petals from my spent roses.

Joshua loves gluing

John-Michael showing me a sequin

OUR FINISHED WORKS OF ART

Here is the one I did

John-Michael's

Joshua's


Saturday, August 20, 2011

Seton Home Study Week 1

Today was our first week of school for the 2011-2012 school year and Seton Home School's Kindergarten week 1.

In addition to our given lesson plans, we used:

Sign of the Cross coloring page

From the St. John the Baptist Catholic Church's page, we used their Assumption of the Blessed Virgin Mary, and the Holy Trinity coloring pages

(and somewhere I found a St. Timothy Coloring page, but I can't find it now)

we read Tower of Babel from the Alice in Bibleland Storybook series

used letter T in the Cuisenaire Rods Alphabet Book

Here is Joshua working today with his Cuisenaire Rods. He loved them so much, he wanted to pull them out today and work with them.

a closeup of his Alligator from his "A" page. Since I hadn't planned any school work today, I just gave him the first available sheets.

Our Seton Preschool curriculum has not arrived yet (although I heard from Seton regarding the delay and most of our curriculum shipped on Friday). So for our first week, I had to create our own. Since the first letter in Phonics for Young Catholics K is the letter T, I made a unit study of T for John-Michael.

I pulled most of the unit from Erica over at Confessions Of a Homeschooler's
Preschool Letter T for Turtle

for Handwriting we used:
Letter Tt tracing
T dots page
Tt sorting
Turtle coloring page
and Turtle writing practice

For Math:
Turtle Size sorting
Turtle color sorting
Counting Practice
Turtle Pattern sheet

John-Michael also used our wooden Tangrams and did the Pre Kinders Turtle Tangram and lessons 1-5 in Mc-Graw Hill's Math Discoveries Pattern Blocks book.

Here is John-Michael working with his Tangrams, I think i found his new favorite thing! I put them out on a cookie sheet I bought for $1 at the Dollar Tree. I have 2 of those steel trays and they are GREAT for using as Tot trays!!

Here is our artwork for the week hanging up.

more artwork


We finished a week's worth of school by Thursday. On Friday, we met up with a couple of our homeschool groups at Wannamkare park for a "Not Back to School" party! The boys had LOTS of fun in the splash pad. Too bad mommy left our bag of swim stuff on the couch! Yikes!!


To finish everything up, we enjoyed s Spaghetti lunch.
Someone LURVES his Spaghetti!!


Our First Day 2011

Yay for our First Day of School 2011!!

Our first day of school was August 15th, the Feast of the Assumption of the Blessed Virgin Mary (for non-Catholics - the Assumption is the day we celebrate when Mary went to heaven - body and soul).

In addition to our regular curriculum, the boys colored an Assumption page, a Sign of the Cross coloring page and read the Tower of Babel story

Here are our beautiful boys working on their school work.

Joshua - our little Kindergartner


John-Michael - our Preschooler


Not Back to School Blog Hop

Our Homeschooling Space

Currently, we have no extra space in our home for a homeschooling classroom. I am tempted to use my dining room like a lot of homeschooling mothers do, but I am planning to use that instead of the breakfast nook area for our meals. If I had not pre-inherited my dining room suite, I would give it up in a heartbeat. But I love my mahogany set. I have been thinking of moving the hutch and table and chairs into the breakfast area and using that, but I don't think it will fit very well.

So for the time being, we are using our breakfast nook and current kitchen table. This table is going to my parents as soon as we get desks for the boys which should be within the next coupe of weeks when we have our trip to Charlotte.

First up is Mommy's desk. This is my early 1900's Sellers kitchen cabinet. Most people call them Hoosier cabinets since Hoosier is the most recognized name. It is in the process of being refinished from the red on the bottom to the plain oat at the top. I am tempted to paint it with milk paint instead of staining the oak. I'll work on it more when it gets cooler outside. I can't wait for it to be finished!!

This is my materials cabinet. The top left is our curriculum books and the top right are books for things like Art, Science, History, Math, etc... The second shelf contains our art supplie like paints, crayons, markers, coloring pencils, stencils, scissors, etc... It also houses our beakers for Science (our test tubes and scales are that the top of the cabinet). Our next shelf has our Kapla blocks, magnifying glasses, flash cards, computer programs, and the boys' pencil boxes.

For the start of the year, Joe and I gave the boys a present of their own pencil boxes. Inside was a "My First Ticonderoga" pencil, 12 pack of Crayola Coloring Pencils, 10pck of Crayola Markers, and a box of 24 Crayola crayons. They each picked out the color of their box. Joshua chose blue, and John-Michael chose green for their boxes.

The basket on the left of the next shelf down contains our Leap Frog Phonics game, and other games. The basket on the right contains more books that I use.

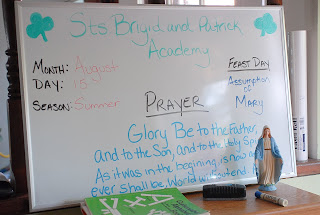
Our whiteboard is on top of our manipulatives area.

Our Manipulatives area. This is where we keep our Lacing beads, Measuring cup games, wooden puzzles, Tanagrams, Cuisenaire Rods, children's games, and Montessori items. I have two cookie sheets that I got from the Dollar Tree that I use to make up Tot trays. These are hands-on activities that I alternate giving bookwork and hands on games while I work individually with each of the boys.


a close-up of our whiteboard. We are the Saints Brigid & Patrick Academy. I tell the boys the day of the week, and the date each morning. As well as any Feast Day. At the bottom is the current prayer we are working on memorizing.

here is our calendar and Pledge of allegiance. Right now I am hanging the current week's artwork on the windows. These are the boy's chairs at the table.

I will post again once we decide on what we are going to use for the boys to sit at. That will allow the space to set up our art and our computer areas as well.

what do you use for a homeschooling area?
Not Back to School Blog Hop
Related Posts Plugin for WordPress, Blogger...